AI courses and coaching exclusively for senior IT professionals, led by a Google Developer Expert (AI)
Code walkthrough – Multi-Agent Customer Support using Antigravity SDK and Gemini 3.5 Flash

Namaste and Welcome to Build It Yourself.
Google recently released Antigravity SDK. In fact, they released multiple things, including – Antigravity IDE, Antigravity SDK, Antigravity 2.0 and Antigravity IDE.
So first I was confused, and then after spending some time, I understood all 4.
Once I learned the difference, I became curious about how Antigravity SDK is different/ better than other frameworks like CrewAI, LangGraph, Autogen and others?
And this tutorial is a byproduct of that curiosity 🙂
Earlier, I built a Multi AI Agent System for Customer Support Automation using CrewAI
So, I thought of building the same application using Google Antigravity SDK to understand the difference.
We will also be using the latest Gemini 3.5 Flash model.
Happy learning!
Pre-requisite
Gemini API Key
Method 1 – Go to http://aistudio.google.com/ and get yourself one but you will be able to use gemini-2.5-flash only
Method 2 – Go to https://console.cloud.google.com/
Create a project. This would cost money on GCP.
Let’s begin
Step 1: Install the required libraries
Code notebook – https://github.com/tayaln/Multi-Agent-Customer-Support-System-using-Google-Antigravity-SDK-and-Gemini-3.5
!pip install google-antigravity beautifulsoup4 –trusted-host pypi.org –trusted-host files.pythonhosted.org –trusted-host pypi.python.org
!pip install –upgrade protobuf –trusted-host pypi.org –trusted-host files.pythonhosted.org –trusted-host pypi.python.org
We install Antigravity SDK by pip install google-antigravity
Google Antigravity SDK provides the infrastructure for building AI agents powered by Gemini. It gives us components like:
- Agent Harness
- SubAgents
- Task Graphs
- Shared memory/context
- Tool execution framework
- Multi-agent orchestration
Learn more about these in detail here – https://www.aimletc.com/harness-engineering-dynamic-sub-agents/
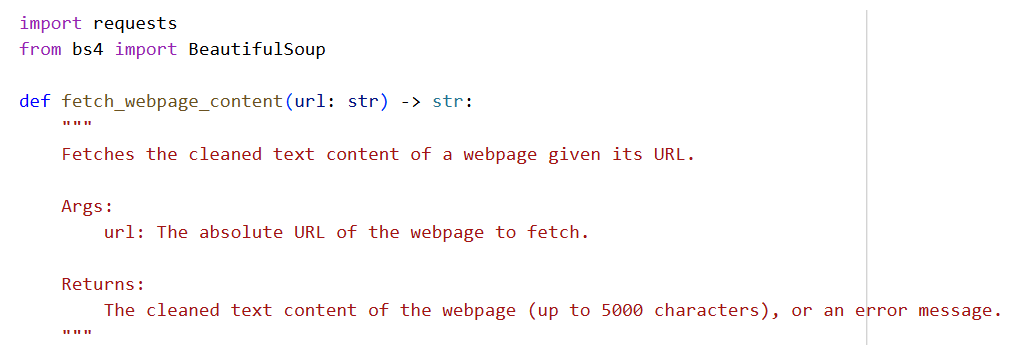
BeautifulSoup is an HTML parsing library. It will be used to extract content from webpages.
protobuf (Protocol Buffers) is Google’s data serialisation library. Many Google AI libraries depend on it for communication between components.
Step 2: Configure a glibc Compatibility Workaround (Linux only)
I used Antigravity 2.0 to come up with this. I first wrote a .py file, but for tutorial purposes wanted to be in Google Colab.
So, asked Antigravity 2.0 to convert to .ipynb, and this is what it added
Basically, we are configuring a Linux compatibility workaround. Google Antigravity internally runs a component called localharness, which may require a newer version of glibc than what’s available on some systems.
Rather than upgrading the entire operating system, we download the required libraries, create a wrapper around the harness, and tell Antigravity to use it.
This ensures that our agents run reliably even on older Linux environments such as Colab or Docker containers.
Step 3: Configure the Gemini API Key
Let’s configure the API Key. In case you don’t have GCP credits, you can use an API key from the Google AI Studio and use the gemini-2.5-flash model.
In this case, refer to this code notebook – https://github.com/tayaln/Multi-Agent-Customer-Support-System-using-Google-Antigravity-SDK-and-Gemini-2.5-Flash
Step 4: Create a Tool to Read Website Content
Now, let’s create a tool that our customer support agents can use to read information from websites.


a. Define the tool
def fetch_webpage_content(url: str) -> str:
This function accepts:
url
and returns:
str
which is the webpage text.
b. Add a User-Agent
headers = {
“User-Agent”: “Mozilla/5.0 …”
}
Some websites block requests that look like bots.
Without a User-Agent:
requests
↓
Website
↓
Access denied
With a User-Agent:
requests + browser identity
↓
Website
↓
Page returned
It makes our request look like it came from Chrome.
C. Download the page
response = requests.get(url, headers=headers, timeout=15)
This sends an HTTP request.
Example:
URL
↓
requests.get()
↓
HTML page
The timeout prevents waiting forever.
d. Parse the HTML
soup = BeautifulSoup(response.text, ‘html.parser’)
Suppose the page contains:
<h1>Refund Policy</h1>
<p>You can request a refund within 30 days.</p>
BeautifulSoup converts this into an object that can be navigated.
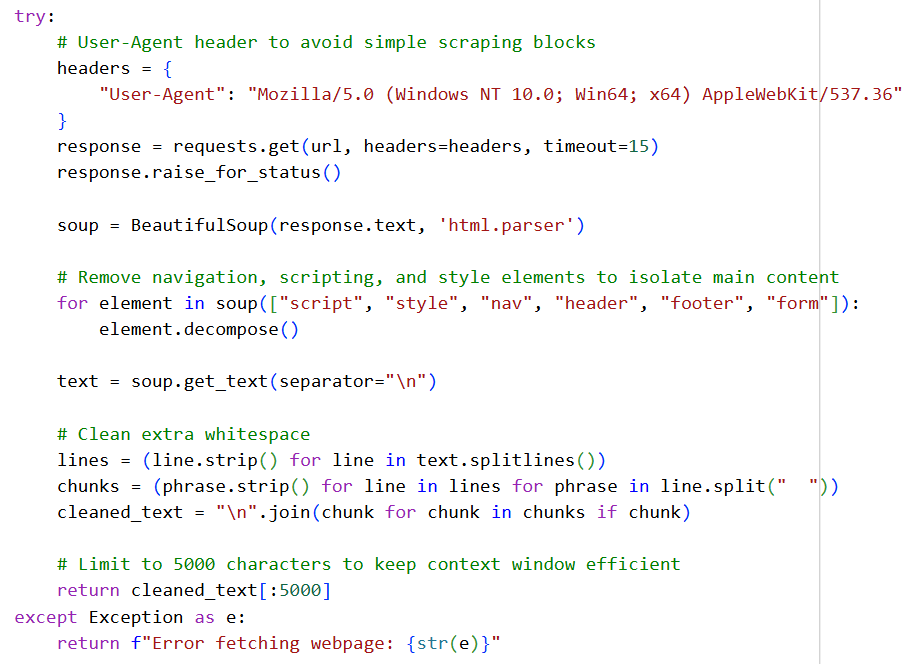
e. Remove unnecessary sections
for element in soup([“script”, “style”, “nav”, “header”, “footer”, “form”]):
element.decompose()
This removes:
- JavaScript
- CSS
- Menus
- Headers
- Footers
- Forms
This helps isolate the main content.
f. Extract text
text = soup.get_text(separator=”\n”)
Converts:
<h1>Refund Policy</h1>
<p>Refunds are allowed within 30 days.</p>
into:
Refund Policy
Refunds are allowed within 30 days.
g. Clean whitespace
lines = (line.strip() for line in text.splitlines())
chunks = (phrase.strip() for line in lines for phrase in line.split(” “))
cleaned_text = “\n”.join(chunk for chunk in chunks if chunk)
This removes:
- Blank lines
- Extra spaces
- Formatting noise
making the content easier for Gemini to understand.
h. Limit to 5000 characters
return cleaned_text[:5000]
Why?
Large pages may contain:
- 50,000+ characters
- Thousands of tokens
Sending everything would:
- increase cost
- slow down responses
- waste context window
Therefore, we keep only the first 5000 characters.
Step 5 – Configure the AI Agents
This is actually a good place to highlight one of Antigravity’s design philosophies.
Unlike CrewAI, where you’d define an Agent with a role, goal, and backstory and later assign it to Tasks, Antigravity starts with an Agent Configuration.
The configuration describes everything the runtime needs to know about an agent: its instructions, tools, policies, and model.
In Antigravity, this is done using LocalAgentConfig.
from google.antigravity import Agent, LocalAgentConfig
from google.antigravity.hooks import policy
What is LocalAgentConfig?
Think of it as an agent blueprint.
It specifies:
- what the agent should do
- which tools it can use
- which model it should use
- what permissions it has
Later, the Agent Harness uses this blueprint to create a running agent.
Configuring the Writer Agent
writer_config = LocalAgentConfig(
system_instructions=(
“You are a helpful customer support Agent.\n”
“Your task is to draft a customer support response to the user’s query.\n”
“You MUST use the `fetch_webpage_content` tool to read the webpage at the provided URL “
“and gather the necessary facts to answer the user’s query accurately.\n”
“Draft a complete, polite, and helpful response. Answer only using facts from the page.”
),
tools=[fetch_webpage_content],
policies=[policy.allow_all()], # Auto-approves the python tool execution
model=”gemini-2.5-flash”
)
This creates the configuration for our Customer Support Agent.
Notice that we’re configuring the agent, we’re not starting it yet.
System Instructions
This is the agent’s permanent instruction set.
Instead of writing:
role=”Customer Support Representative”
goal=”Help customers”
backstory=”…”
like in CrewAI, Antigravity simply uses a detailed system prompt.
Here we’re telling the agent:
- You are a customer support agent.
- Read the documentation.
- Use the provided tool.
- Answer only using facts from the webpage.
- Write a polite response.
This becomes the agent’s behaviour for every conversation.
Registering Tools
This is one of the cleanest parts of Antigravity.
We’re simply giving the agent a normal Python function.
Whenever Gemini decides it needs more information, it can automatically invoke this function.
Unlike some frameworks, we don’t need to create a custom Tool class or wrapper.
Policies
Policies determine what the agent is allowed to do.
Here we use:
policy.allow_all()
which means:
Automatically approve every tool invocation.
So if the model decides to call:
fetch_webpage_content(…)
the Agent Harness executes it immediately without asking for confirmation.
This makes sense for a notebook demonstration.
In a production application, you might choose stricter policies for sensitive tools.
Choosing the Model
model=”gemini-3.5-flash”
Finally, we specify which Gemini model should power this agent.
One advantage of Antigravity is that different agents can use different models.
For example:
- Support Agent → Gemini Flash
- Escalation Agent → Gemini Pro
- Summarization Agent → Gemini Nano (when available)
Each agent can be optimized for its specific task.
Now, let’s similarly configure the Quality Check Agent.
Its responsibility is different.
Instead of answering customers, it reviews another agent’s work.
Its instructions tell it to verify:
- factual correctness
- completeness
- professionalism
- grammar
- formatting
If the response needs improvement, it rewrites it before sending it back.
Step 6 – Orchestrating the Multi-Agent Workflow
This is where the architectural difference between CrewAI and Antigravity becomes very clear.
In CrewAI, this orchestration would typically be represented as Tasks executed by a Crew.
In Antigravity, there are no Task objects. The orchestration is simply written in normal Python, while the Agent Harness manages the execution of each agent.
import asyncio
Since Antigravity is built on asynchronous execution, we define our workflow as an async function.
async def run_customer_support_pipeline(url: str, query: str):
This function coordinates the entire customer support process.
Think of it as the workflow controller.
Launch the Support Agent
async with Agent(writer_config) as writer:
This line creates a running instance of our Support Agent using the configuration we defined earlier.
When this line executes, the Agent Harness:
- creates the agent
- initializes its model
- registers its tools
- applies its policies
- prepares it to receive messages
When the async with block exits, the agent is automatically cleaned up.
Send the Customer Request
prompt = f”Please read the webpage at {url} and answer this customer query: ‘{query}'”
writer_response = await writer.chat(prompt)
Instead of assigning a Task, we simply send the agent a message.
The prompt contains:
- the webpage URL
- the customer’s question
Automatic Tool Calling
The Support Agent has access to:
tools=[
fetch_webpage_content
]
When Gemini determines that it needs the webpage content, the Agent Harness automatically invokes:
Notice that we never explicitly call:
fetch_webpage_content(url)
The model decides when to use the tool.
Retrieve the Draft
draft_text = await writer_response.text()
The response object may contain more than just text.
Calling:
.text()
extracts the final response generated by the agent.
Launch the Reviewer Agent
async with Agent(reviewer_config) as reviewer:
Now we create another agent.
This agent has completely different instructions.
Its only responsibility is quality assurance.
Send the Draft for Review
reviewer.chat(qc_prompt)
We provide:
- the original customer query
- the draft created by the Support Agent
The Reviewer evaluates:
- factual correctness
- professionalism
- grammar
- formatting
If needed, it rewrites the response before approving it.
Final Response
final_text = await reviewer_response.text()
Finally, we retrieve the reviewed response and display it to the customer.
Step 7 – Execute the Multi-Agent Pipeline
This final step is straightforward, but it’s a good opportunity to tie together everything that has been built so far.
# Real test inputs
test_url = “https://www.aimletc.com/online-instructor-led-ai-llm-coaching-for-it-technical-professionals/”
test_query = “Who will benefit most from this course?”
# Execute the pipeline
await run_customer_support_pipeline(test_url, test_query)
What is happening here?
Up to this point, we’ve:
- Created a tool to read webpages
- Configured two AI agents
- Built a workflow that coordinates those agents
Now, we simply provide the inputs and execute the pipeline.
The inputs are:
- a webpage containing the information
- a customer question
The orchestration function takes care of everything else.
Step a: Provide the webpage
test_url = “…”
This is the knowledge source that the Support Agent will use.
Instead of relying on the model’s built-in knowledge, the agent will retrieve the latest information directly from this webpage.
Step b: Provide the customer’s question
test_query = “Who will benefit most from this course?”
This represents the customer’s request.
The Support Agent will answer this question using facts extracted from the webpage.
Step c: Execute the workflow
await run_customer_support_pipeline(
test_url,
test_query
)
This starts the entire multi-agent workflow.
Notice that we don’t manually invoke either agent.
We simply execute the pipeline.
The orchestration function coordinates everything.
What happens behind the scenes?
When this single line executes:
await run_customer_support_pipeline(…)
the Agent Harness automatically:
- creates the Support Agent
- initializes Gemini
- registers the webpage-fetching tool
- allows the model to invoke the tool
- returns the drafted response
- creates the Reviewer Agent
- sends the draft for review
- retrieves the final approved response
- shuts down both agents
All of this happens automatically without us having to manage the agent lifecycle ourselves.
Difference from CrewAI
In the CrewAI notebook, the final execution would look something like:
crew.kickoff(inputs={…})
The Crew executes the predefined Tasks in the specified order.
In Antigravity, we execute a normal Python function:
await run_customer_support_pipeline(…)
The workflow is explicit in our Python code, while the Agent Harness manages the creation, execution, and cleanup of the agents behind the scenes.
Hope you liked the tutorial. If you have any queries, feel free to reach out to me on LinkedIn – https://www.linkedin.com/in/nikhileshtayal/
The most up-to-date AI + LLM Coaching
In case you are looking to learn AI + Gen AI in an instructor-led live class environment, check out these courses
Happy learning!


